

When it comes to installing an Air Admittance Valve (AAV), one detail you can’t afford to overlook is its installation height. Getting this right isn’t just about following rules—it directly affects how well your plumbing system breathes and drains.
If you’re wondering where exactly to place your valve under the sink or in other areas, this guide will clear up the confusion. You’ll learn why the height matters, how it impacts performance, and what common mistakes to avoid. By the time you finish reading, you’ll have the confidence to install your AAV correctly and keep your home free from unwanted odors and drainage issues.
Ready to get it right the first time? Let’s dive in.
Air Admittance Valves Basics
Air admittance valves (AAVs) are vital parts of modern plumbing systems. They help maintain proper air pressure in drainage pipes. This section explains the basics of air admittance valves, including their purpose, function, and common uses.
Purpose And Function
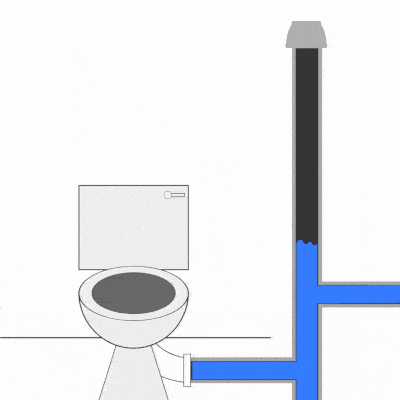
An air admittance valve allows air to enter drainage pipes. It prevents negative pressure that can block water flow. The valve opens only when needed, letting air in. It stops sewer gases from escaping into the building. This keeps plumbing systems working smoothly and safely.
Common Applications
AAVs are often used in kitchens, bathrooms, and laundry rooms. They are handy where roof vent installation is difficult. These valves fit under sinks or inside cabinets. They work well in remodeling projects or tight spaces. AAVs help reduce the number of roof penetrations needed. This can save time and money during installation.
Installation Height Essentials
Proper installation height is key for air admittance valves (AAVs). Correct height ensures good airflow and prevents sewer gases from entering the home. Installing the valve too high or too low can cause problems with drainage and venting.
Understanding the right height helps maintain system performance and avoids costly repairs. This section covers the essentials of AAV installation height.
Recommended Height Range
Most codes suggest installing the AAV between 4 and 6 inches above the fixture drain. This height allows air to enter smoothly without letting odors escape. The valve should never be below the flood level of the fixture. Also, avoid placing it inside cabinets without ventilation.
Impact Of Incorrect Height
Installing the valve too low can cause water to enter the valve, blocking airflow. This leads to slow drainage and gurgling noises. If placed too high, the valve might not open properly, causing negative pressure and siphoning of traps. Wrong height can also allow sewer gases to leak into living spaces, creating health risks.
Placement Guidelines
Proper placement of an Air Admittance Valve (AAV) is crucial for its effective operation. Following placement guidelines ensures the valve functions well and avoids common problems. Correct height and location help maintain air flow and prevent sewer gas leaks. Understanding where and how to install the valve can save time and reduce future issues.
Under Sink Installation
Install the AAV close to the fixture drain pipe under the sink. The valve should be at least 4 inches above the horizontal branch drain. This height prevents water from entering the valve. Avoid placing the valve inside a cabinet with poor ventilation. Proper positioning ensures the valve opens and closes correctly.
Accessibility Requirements
The valve must be easy to reach for inspection and maintenance. Place it where it can be accessed without removing fixtures or cabinets. Accessibility helps detect faults early. It also allows quick replacement if the valve fails. Keep the valve out of tight or hard-to-reach spaces.
Avoiding Obstructions
Ensure the valve is free from any blockages or objects nearby. Obstructions can stop air from flowing into the valve. Keep it away from walls, pipes, or shelves that may restrict airflow. Do not install the valve near sources of heat or moisture. Clear space around the valve supports its proper function.
Credit: www.drainagesuperstore.co.uk
Building Code Considerations
Installing an Air Admittance Valve (AAV) requires careful attention to building codes. These codes ensure safety and proper function. The installation height and placement depend on specific regulations. Understanding these rules avoids costly mistakes and code violations. Below, explore key building code considerations for AAV installation height.
Local Code Variations
Building codes differ by city and state. Some areas allow AAVs freely, while others restrict their use. Local codes may specify exact heights for valve installation. Always check your local plumbing code before installation. Ignoring local rules can cause inspection failures and extra work.
When Aavs Are Allowed
Not all plumbing systems permit AAV use. Many codes allow AAVs only for certain fixtures. Bathrooms and kitchens often qualify, but main vents usually do not. Some codes require roof vents alongside AAVs. Confirm whether your system and location allow an AAV.
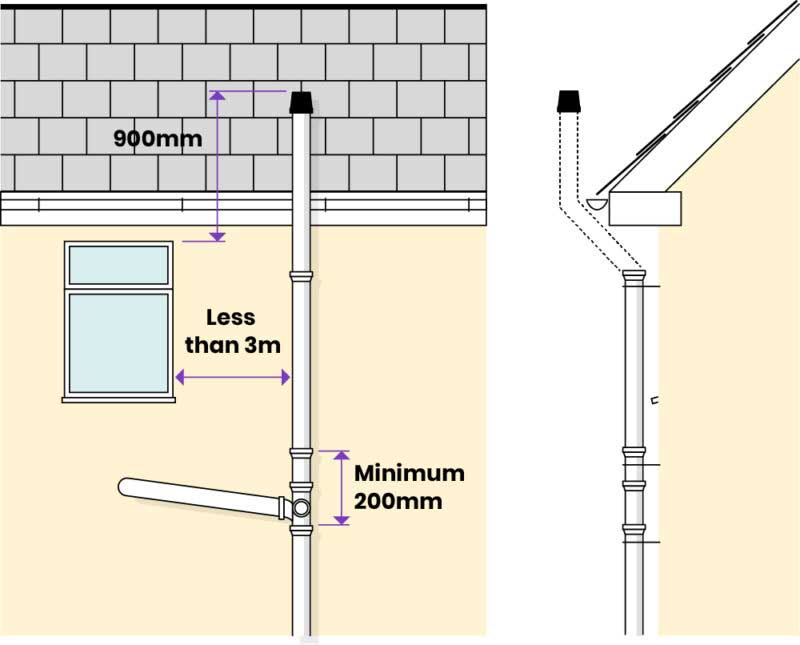
Roof Vent Requirements
Roof vents help release sewer gases safely outdoors. Codes may require roof vents even if AAVs are installed. Roof vent height and placement are strictly regulated. Roof vents must extend above the roofline to prevent gas entry. Combining roof vents with AAVs ensures better ventilation and code compliance.
Common Installation Mistakes
Installing an air admittance valve (AAV) correctly is crucial for proper plumbing function. Many common mistakes occur during installation, especially concerning the valve’s height and placement. These errors affect ventilation and can cause drainage problems or sewer gas leaks. Understanding these mistakes helps ensure a safe and efficient system.
Too Low Or Too High Placement
Placing the valve too low reduces its ability to vent air properly. This can lead to slow drainage and trap sewer gases inside the pipes. Conversely, installing it too high may cause the valve to fail in opening when needed. The valve should be at the right height, typically above the flood level rim of the fixture it serves.
Hidden Or Inaccessible Locations
Hiding the valve inside walls or tight spaces makes maintenance difficult. If the valve needs repair or replacement, hard access can increase costs and delay fixes. The valve must remain easy to reach and inspect. Good access prevents long-term plumbing issues.
Ignoring Manufacturer Instructions
Skipping the manufacturer’s guidelines often causes installation errors. Each AAV model has specific rules about height, orientation, and positioning. Not following these rules may void warranties and lead to valve failure. Always read and apply the instructions carefully for reliable performance.
Credit: www.easymerchant.co.uk
Performance Challenges
Installing an air admittance valve (AAV) at the correct height is crucial. Incorrect height leads to several performance challenges that affect plumbing efficiency. These issues can cause discomfort and damage if not addressed quickly. Understanding common problems helps ensure proper installation and long-term function.
Slow Draining And Gurgling
When an AAV is installed too low, it may not vent air properly. This causes slow drainage in sinks, tubs, or toilets. Water drains sluggishly and traps air pockets, leading to gurgling sounds. These noises indicate pressure imbalances in the plumbing system. Proper height allows air to enter freely, preventing these problems.
Noise Issues
Incorrect installation height can cause the valve to open or close too often. This creates clicking or popping sounds in the pipes. Noise can also result from trapped air or water hitting the valve. AAVs installed too close to water sources tend to be noisier. Positioning the valve at the right height reduces these disturbing sounds.
Pressure And Airflow Limits
AAVs have limits on how much air they can handle. Installing the valve too high or too low affects airflow and pressure balance. Excessive pressure can damage the valve or cause it to fail. Low airflow restricts venting, leading to vacuum issues in drains. Correct installation height ensures smooth airflow and stable pressure.
Mechanical And Functional Risks
Installing an Air Admittance Valve (AAV) at the correct height is vital for its mechanical and functional reliability. Improper installation height can cause several risks that impact the valve’s performance and safety. Understanding these risks helps avoid costly repairs and health hazards.
Valve Failure And Leakage
Air Admittance Valves contain moving parts that wear out over time. The rubber flap inside can break or stick, preventing proper airflow. This failure leads to leaks, allowing sewer gases to enter the living space. Incorrect installation height can increase stress on the valve, speeding up damage. Regular checks and correct placement reduce the chance of failure and leakage.
Incompatibility With Sewage Pumps
AAVs are not designed to work with sewage ejector pumps. These pumps create positive pressure that the valve cannot handle. Installing an AAV too low or near a pump can cause the valve to malfunction. This mismatch leads to slow drainage and backflow problems. Understanding the system’s components ensures proper valve placement and avoids pump conflicts.
Sewer Gas Risks
One main purpose of an AAV is to block sewer gases from entering the home. A valve installed at the wrong height might not seal correctly. This flaw can allow harmful gases to leak indoors, posing health risks. Poor ventilation also causes odors and discomfort. Correct installation height ensures the valve works effectively to keep air fresh and safe.
Maintenance And Inspection Tips
Proper maintenance and regular inspection keep your air admittance valve working well. This prevents sewer gas from entering your home and avoids drainage problems. Understanding simple steps helps you maintain the valve and detect issues early. Follow these tips to ensure your valve lasts longer and works efficiently.
Routine Checks
Check the valve at least twice a year. Look for cracks, dirt, or damage on the valve body. Make sure the valve moves freely and is not stuck. Listen for unusual sounds like gurgling or hissing. These can mean the valve is not sealing properly. Clean any dust or debris around the valve to keep it clear.
Replacing Faulty Valves
Replace the valve if it shows signs of wear or damage. A faulty valve can cause bad smells and slow draining. Turn off the water supply before removing the old valve. Install the new valve at the correct height for proper function. Test the valve after installation to confirm it works smoothly and seals tightly.
Ensuring Proper Ventilation
Check that the valve is installed at the right height above the trap. This helps air flow and prevents water from siphoning out. Keep the area around the valve free from obstructions. Good ventilation reduces pressure problems in your plumbing. Proper installation and ventilation extend the valve’s life and improve home safety.
Choosing The Right Valve
Choosing the right air admittance valve (AAV) is crucial for a plumbing system’s efficiency. The valve must fit the system’s size and function properly. It also needs to meet quality standards to avoid failures. Selecting the correct valve prevents leaks and ensures good airflow. This section explains how to choose the best valve for your needs.
Valve Types And Sizes
Air admittance valves come in different types and sizes. Choose a valve size that matches the pipe diameter. Common sizes include 1½ inch and 2 inch valves. Some valves are designed for specific fixtures like sinks or toilets. Using the right type ensures proper air flow and prevents water traps from drying out. Check the product details before buying.
Quality And Certification
Quality matters for long-term valve performance. Look for valves made from durable materials like ABS or PVC. Certified valves meet local plumbing codes and safety standards. Certifications from recognized bodies show the valve passed tests. A certified valve reduces risks of leaks and odors. Avoid cheap valves that lack certification to save future costs.
Matching System Needs
Each plumbing system has unique needs. Consider the number of fixtures connected to the valve. A valve that handles more air flow suits larger systems. Some valves work better in tight spaces or under sinks. Check the valve’s pressure rating and installation height limits. Matching the valve to the system prevents issues like slow draining or noise.
:strip_icc()/air-admittance-valve-b5d78cbecf6e4b26bd8a37f76691a632.jpg)
Credit: www.bhg.com
Installation Best Practices
Proper installation height is crucial for Air Admittance Valves (AAVs) to work efficiently. Installing the valve at the right height ensures proper airflow and prevents sewer gases from entering your home. Following best practices during installation improves valve performance and durability. Below, find detailed steps, necessary tools, and testing tips for a successful setup.
Step-by-step Guide
First, locate the pipe where the AAV will be installed. It should be at least 4 inches above the horizontal drain line. This height prevents water from entering the valve. Next, cut the pipe cleanly using a pipe cutter. Remove any debris or burrs to ensure a tight fit.
Apply primer and solvent cement to the pipe end and valve socket. Insert the valve firmly, twisting slightly to spread the cement evenly. Hold it in place for a few seconds until it sets. Finally, secure the valve and check the surrounding area for leaks.
Tools And Materials Needed
You will need a pipe cutter or saw for clean cuts. A measuring tape helps maintain the correct installation height. Use primer and solvent cement compatible with your pipe material. Gloves protect your hands during work. Have a clean cloth ready to wipe off excess cement.
Additionally, select an AAV model approved for your plumbing system. Check local codes to ensure compliance. Using the right tools and materials guarantees a safe and lasting installation.
Testing The Installation
After installing, test the valve to confirm proper operation. Run water through the drain to create airflow. Listen for any unusual sounds like gurgling or whistling, which indicate issues. Check for odors near the valve area to detect leaks.
If you spot leaks or smells, recheck the connections and sealant. A well-installed AAV should open quietly and allow air in without letting gases out. Regular testing helps maintain a healthy plumbing system.
Frequently Asked Questions
What Is The Downside To An Air Admittance Valve?
Air admittance valves may fail over time, causing sewer gas leaks, slow drainage, gurgling noises, and are not allowed by all codes. They don’t handle positive pressure well and require proper installation and maintenance access.
What Is The Height Code For Plumbing Vents?
Plumbing vent height codes require vents to extend at least 6 inches above the roof surface. This prevents sewer gas entry and ensures proper ventilation. Local codes may vary, so always check specific regulations before installation.
Where To Position An Air Admittance Valve?
Position an air admittance valve vertically, above the fixture’s flood level, and in an accessible location for maintenance. Avoid installing it inside walls or below sinks. Ensure it complies with local building codes and is easy to inspect or replace.
Where To Locate An Air Admittance Valve?
Install an air admittance valve above the fixture’s drain line, at least 4 inches above the trap arm. Place it in an accessible, dry location. Avoid installing inside cabinets or below fixtures to ensure proper ventilation and maintenance access.
Conclusion
Installing an air admittance valve at the correct height is crucial. It ensures proper airflow and prevents drainage issues. Place the valve where it stays dry and accessible for maintenance. Avoid low spots that trap water or block the valve.
Always check local building codes before installation. Proper height helps the valve work efficiently and reduces sewer gas risks. A well-installed valve keeps your plumbing system running smoothly. Remember, careful placement protects your home’s air quality and plumbing health.