
To remove the plastic insert from a SharkBite fitting for copper pipe, simply use a SharkBite disconnect clip. Gently push the disconnect clip against the fitting collar to release the plastic insert, and then remove it from the pipe.
Are you facing the challenge of removing the plastic insert from a SharkBite fitting for copper pipes? Understanding how to correctly remove the plastic insert is crucial to prevent leaks and ensure a secure connection. In this guide, we’ll provide you with clear and easy-to-follow steps to effectively remove the plastic insert from a SharkBite fitting.
By the end of this article, you’ll have the knowledge and confidence to tackle this task with ease, ensuring a successful plumbing project.
Importance Of Proper Removal
When it comes to the importance of proper removal of Sharkbite plastic inserts for copper pipes, ensuring the longevity of the pipes is crucial. This process helps in preventing potential leaks that can lead to costly repairs and damage. Proper removal also plays a significant role in protecting the integrity of fittings, ensuring a secure and reliable plumbing system. By following the correct removal procedures, you can maintain the structural strength of the copper pipes and fittings, avoiding any potential issues that may arise due to improper removal methods.
Sharkbite Remove Plastic Insert For Copper
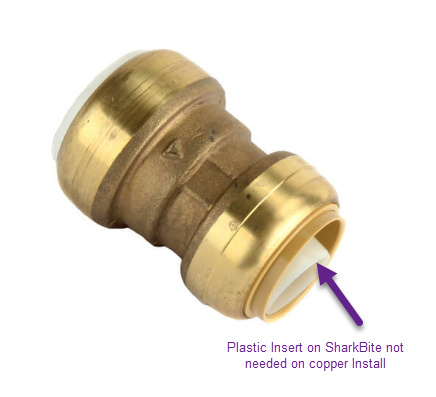
When using Sharkbite fittings with copper pipes, it is essential to understand the connection system. The plastic insert in Sharkbite fittings is designed to support PEX tubing, so it’s crucial to remove it when working with copper pipes. By doing so, you ensure a proper connection and prevent any potential issues. Recognizing the different types of Sharkbite fittings is important as well, as each may require specific handling. Properly understanding and applying these aspects of Sharkbite fittings ensures a secure and efficient plumbing system.
Step-by-step Removal Guide
- Adjustable wrench
- Utility knife
- Deburring tool
- Nylon brush
Detailed steps to safely remove the plastic insert:
1. Turn off the water supply to the affected area.
2. Use the adjustable wrench to carefully loosen and remove the SharkBite fitting from the copper pipe.
3. Once the fitting is removed, use the utility knife to score the plastic insert. Be cautious not to cut into the copper pipe.
4. Gently pull the plastic insert out of the pipe using pliers or a similar tool.
5. After removing the plastic insert, use the deburring tool and nylon brush to clean the inside of the pipe.
Tips for avoiding damage to the pipe or fitting:
1. Avoid using excessive force when removing the plastic insert to prevent damage to the pipe.
2. Take your time and work carefully to ensure the surrounding components are not affected during the removal process.

Credit: www.plbg.com
Troubleshooting Common Issues
When dealing with a Sharkbite remove plastic insert for copper, it is common to encounter issues such as a stuck plastic insert. In such situations, gentle tapping and twisting can often help release the insert. If minor damage occurs during removal, careful evaluation and potential reaming of the copper pipe might be necessary to ensure a proper fit for the new fitting. It is important to know when to seek professional assistance to avoid further damage or complications when troubleshooting such issues.
Maintenance After Removal
After removing the Sharkbite plastic insert from a copper pipe, it is essential to thoroughly inspect the pipe for any damage or wear. Look for any signs of corrosion, leaks, or structural weaknesses, especially around the area where the plastic insert was previously located. Additionally, reinforce the connection properly to ensure it remains secure. Utilizing appropriate tools and materials, such as a pipe deburrer and a SharkBite depth gauge, is crucial. This ensures that the pipe is clean and the coupling is correctly installed. To prevent similar issues in the future, consider regularly checking and maintaining your plumbing system to identify any potential problems early on.
Frequently Asked Questions Of Sharkbite Remove Plastic Insert For Copper
What Is A Sharkbite Remove Plastic Insert Tool Used For?
The SharkBite remove plastic insert tool is used for removing plastic PEX inserts from copper fittings quickly and efficiently. It provides a safe and easy way to make modifications to existing copper fitting connections without the need for soldering or other heat-based methods.
How Do I Use The Sharkbite Remove Plastic Insert Tool?
To use the SharkBite remove plastic insert tool, simply place the tool over the existing copper fitting, push it down to engage the plastic insert, and then pull the tool upwards to remove the insert. It’s a straightforward process that can be completed in seconds, making it an ideal solution for plumbers and DIY enthusiasts alike.
What Are The Benefits Of Using The Sharkbite Remove Plastic Insert Tool?
The SharkBite remove plastic insert tool offers several benefits, including its ability to streamline modifications to copper fitting connections, its ease of use, and the fact that it eliminates the need for heat-based methods such as soldering. This makes it a convenient and practical tool for a wide range of plumbing projects.
Conclusion
After learning about the benefits and installation process of the Sharkbite Remove Plastic Insert for Copper, it’s clear that this product is a game-changer for plumbing professionals and DIY enthusiasts. With its easy-to-use design and reliable performance, this innovation streamlines the fitting process, making it a must-have for any plumbing project.
Upgrade your plumbing toolkit with Sharkbite today.