
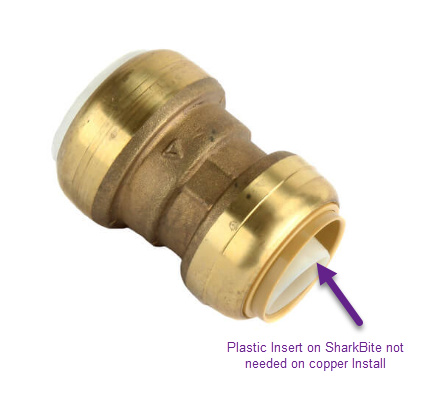
When using SharkBite fittings with copper tubing, the plastic insert is not required according to the manufacturer’s instructions. However, it can be removed using the SharkBite Disconnect Clip or Disconnect Tongs for ease of installation.
The plastic insert does not serve a purpose when used with copper tubing, but its removal is optional. It’s essential to follow the manufacturer’s guidelines for proper installation, ensuring a secure and leak-free connection. If you’re working with SharkBite fittings and copper tubing, understanding the role of the plastic insert is crucial.
While the manufacturer’s instructions state that it’s not necessary for copper tubing, they also indicate that its removal is not mandatory. In this comprehensive guide, we’ll delve into the specifics of using SharkBite fittings with copper tubing and provide insights into the removal of the plastic insert. By the end, you’ll have a clear understanding of the appropriate procedures for working with SharkBite fittings and copper tubing, ensuring optimal performance and reliability.
Benefits Of Removing The Plastic Insert
Removing the plastic insert from SharkBite fittings enhances longevity by allowing for a proper fitting of copper pipe. It also decreases the risk of leaks, ensuring a more secure connection. Ultimately, this process ensures that the fitting functions effectively over time, providing a durable and reliable solution for plumbing needs.
Tips For Easy Removal
|
When removing a plastic insert from a SharkBite fitting, it’s essential to follow the manufacturer’s guidelines for a seamless removal process. Ensuring correct tools is the first step, as using improper tools can damage the fitting. Familiarize yourself with the manufacturer guidelines to understand the specific instructions for the removal process. Following the step-by-step removal process will ensure that the plastic insert is removed without causing any damage to the fitting or the copper pipe. Remember to handle the removal process with care and precision to maintain the integrity of the SharkBite fitting. |
Common Questions And Concerns
When using SharkBite fittings with copper tubing, it is essential to understand the need for the plastic insert.
The manufacturer states that while it is not mandatory to remove the plastic insert, proper preparation of the copper pipe is crucial for a secure and leak-free connection.
Having insights from home improvement communities and following the manufacturer’s instructions may provide clarity on whether the plastic insert is necessary and the significance of correct copper pipe preparation for using SharkBite fittings.

Credit: www.amazon.com
Frequently Asked Questions For Sharkbite Remove Plastic Insert For Copper
Do You Need The Plastic Insert For Sharkbite Fittings?
Yes, for copper tubing, the plastic insert is not necessary but can be left inside.
What Is The Tube Liner For On Sharkbite?
The tube liner on SharkBite fittings supports PEX tubing and ensures a proper o-ring seal. It can be removed if needed.
How Do You Remove A Sharkbite Insert?
To remove a SharkBite insert, use a Disconnect Clip or Disconnect Tongs to easily pull it out. SharkBite fittings can be used without the insert on copper tubing.
How Do You Prepare A Copper Pipe For A Sharkbite?
To prepare a copper pipe for a SharkBite, mark the insertion depth, clean and deburr the pipe, and push the fitting onto the pipe until fully seated. No need to remove the plastic insert for copper tubing. Use a SharkBite Disconnect Clip to remove the insert if necessary.
Conclusion
Removing the plastic insert for SharkBite fittings when using copper tubing is a matter of preference. While the manufacturer instructions suggest it’s not necessary, some professionals find it easier to remove it. Ultimately, whether or not to remove the insert depends on individual circumstances.
For more information on SharkBite fittings, refer to our comprehensive guide.