Adjusting a toilet fill valve is simple and essential. It helps control water flow and prevents leaks.
Are you experiencing a constantly running toilet or low water levels? You might need to adjust the fill valve. This small part in your toilet tank plays a big role in its function. Correctly adjusting it can save water and avoid costly repairs.
With just a few tools and our easy-to-follow instructions, your toilet can work perfectly again. Ready to fix that annoying toilet issue? Let’s get started!
Tools Needed
Adjusting a toilet fill valve can seem daunting. But with the right tools, it can be simple. The toilet fill valve controls the toilet water level. Proper adjustment ensures efficient flushing and water use.
and
Basic Tools
To adjust a toilet fill valve, you’ll need some basic tools. These tools are essential for a smooth process. Here is a list of the basic tools:
- Adjustable Wrench: Useful for loosening and tightening nuts.
- Flathead Screwdriver: Helps in adjusting the fill valve screw.
- Bucket: To catch any water from the water supply line.
- Towel: Handy for cleaning any spills.
These tools make the job easier and faster. An adjustable wrench is crucial for handling the fill valve replacement. A flathead screwdriver is necessary for the float height adjustment. A bucket will help you manage any water spills from the plumbing tools. Keeping a towel nearby ensures the area stays dry. Following these toilet repair guide tips will simplify the process.
Safety Gear
Safety is important when working on toilet maintenance. Using the right safety gear can protect you. Here’s what you need:
- Gloves: Protect your hands from dirt and bacteria.
- Safety Goggles: Shield your eyes from splashes.
- Apron: Keep your clothes clean and dry.
Wearing gloves is crucial for hygiene. They prevent direct contact with dirty surfaces. Safety goggles protect your eyes from unexpected water sprays. An apron keeps you clean during the toilet fill valve adjustment. These simple items can make a big difference. They ensure you stay safe and comfortable while working.
Types Of Fill Valves
Adjusting a toilet fill valve is a simple yet crucial part of bathroom fixture maintenance. A properly adjusted fill valve ensures efficient toilet flushes and prevents water wastage.
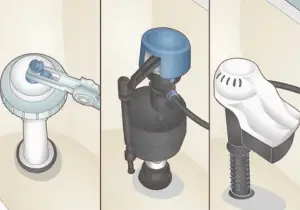
Float Ball Valve
The float ball valve is one of the oldest types of fill valves. It uses a float ball attached to a metal arm. This arm controls the water level in the tank. Adjusting this type of valve requires a few simple steps:
- First, locate the float ball inside the toilet tank.
- Then, observe the water level. It should be about 1 inch below the overflow tube.
- Adjust the float arm if the water level is too high or too low.
To adjust the float arm, look for a screw at the top of the fill valve. Turning this screw clockwise lowers the water level. Turning it counterclockwise raises the water level. Make small adjustments and check the water level after each turn.
Cup Float Valve
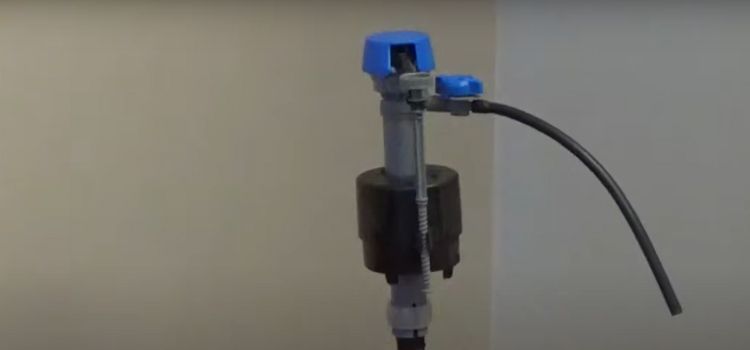
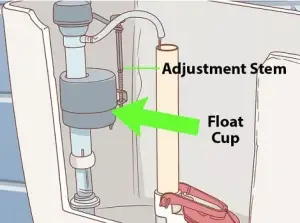
The cup float valve is a more modern fill valve design. It uses a plastic cup that moves up and down the fill valve shaft. This type is easier to adjust compared to the float ball valve. Here’s how to do it:
- First, locate the cup float on the fill valve shaft.
- Check the water level in the tank. It should be just below the top of the overflow tube.
- If the water level is incorrect, find the adjustment clip on the side of the fill valve.
Moving the cup float up increases the water level. Moving it down decreases the water level. Make small adjustments and test the toilet flush after each change.
Shutting Off Water Supply
Adjusting a toilet fill valve is an essential skill for maintaining your bathroom. The fill valve controls the water level in the toilet tank. When it malfunctions, it can cause the toilet to run continuously or not fill properly. Knowing how to adjust it can save you time and money. The first step in this process is shutting off the water supply. This ensures you can work on the valve without causing a mess or wasting water.
Locating The Shut-off Valve
The shut-off valve is usually found near the base of the toilet. It’s important to locate it before you start the adjustment process. This valve controls the flow of water into the toilet tank.
Here are the common places you might find the shut-off valve:
- Behind the toilet, near the wall.
- On the floor, close to the toilet base.
- In some older homes, it might be in the basement.
Once you locate the valve, inspect it to ensure it’s in good condition. A broken or corroded valve can cause leaks and other issues. If the valve looks damaged, consider replacing it before proceeding. Turning the valve clockwise will shut off the water. Be gentle, as forcing it could break the valve.
Turning Off The Water
Once you have located the shut-off valve, it’s time to turn off the water.
Follow these steps to turn off the water supply:
- Turn the shut-off valve clockwise.
- Continue turning until it stops.
- Check the toilet by flushing it.
- Ensure no water refills the tank.
If the tank still fills with water, the valve might not be fully closed. Tighten it a bit more, but don’t force it. If the valve is stuck, you might need a wrench. Be careful not to damage the valve or pipes. If you cannot close the valve, it may need replacement.
Removing The Tank Lid
Adjusting a toilet fill valve can solve many common toilet issues. This process involves removing the tank lid carefully. Knowing how to handle and set aside the lid safely is essential to avoid damage.
Careful Handling
Removing the tank lid might seem simple, but it requires care. Avoid dropping or mishandling it as it can break easily. First, place both hands firmly on the sides of the lid. Lift it straight up without tilting. This helps prevent the lid from slipping.
Here’s a checklist for careful handling:
- Ensure your hands are dry to avoid slipping.
- Lift the lid slowly and steadily.
- Keep a firm grip on both sides.
- Avoid placing the lid on the toilet seat.
It is crucial to handle the tank lid carefully. Mishandling can lead to cracks or damage. Remember, the lid is often made of fragile material. Treat it gently to ensure it stays intact.
Setting Aside Safely
After lifting the tank lid, it is essential to set it aside safely. Find a flat, stable surface where the lid won’t be in the way. A sturdy countertop or table works well. Avoid placing it near edges where it might fall.
Follow these tips for safe placement:
- Place a towel or soft cloth on the surface first.
- Set the lid down slowly and gently.
- Ensure the surface is flat and stable.
- Keep the lid away from edges.
Using a towel or soft cloth helps cushion the lid. This prevents scratches or damage to both the lid and the surface. Always check the stability of the surface before setting down the lid. This way, you can safely proceed with adjusting the fill valve.
Adjusting The Water Level
Adjusting the toilet fill valve is essential to maintain the right water level in your toilet tank. A properly adjusted fill valve ensures efficient flushing and prevents water wastage. This guide will help you understand how to adjust the water level by using the float adjustment and screw mechanism.
Float Adjustment
The float adjustment is one of the primary ways to control the water level in your toilet tank. The float is a small plastic ball or cup attached to the fill valve. It rises and falls with the water level.
Follow these steps to adjust the float:
- First, turn off the water supply to the toilet. This is usually done by turning the valve located behind the toilet clockwise.
- Next, flush the toilet to empty the tank.
- Locate the float. If it is a ball float, it will be attached to a metal arm. If it is a cup float, it will slide up and down a vertical rod.
- For a ball float, bend the metal arm gently upward to raise the water level or downward to lower it. For a cup float, pinch the metal clip on the side of the float and slide it up or down the rod.
After adjusting the float, turn the water supply back on and allow the tank to fill. Check the water level. It should be about 1 inch below the top of the overflow tube. Repeat the adjustment if necessary until the desired water level is achieved.
Screw Mechanism
The screw mechanism is another method to adjust the water level in your toilet tank. This method is common in newer toilets with a float cup system.
Follow these steps to adjust the water level using the screw mechanism:
- Turn off the water supply to the toilet by turning the valve behind the toilet clockwise.
- Flush the toilet to empty the tank.
- Locate the fill valve. There should be a small screw on top or the side of the valve.
- Use a screwdriver to turn the adjustment screw. Turning the screw clockwise will raise the water level, while turning it counterclockwise will lower it.
After adjusting, turn the water supply back on and allow the tank to fill. Check the water level. It should be about 1 inch below the top of the overflow tube. Repeat the adjustment if necessary until the desired water level is achieved.
Remember, a properly adjusted toilet fill valve ensures efficient flushing and prevents water wastage.
Testing The Adjustment
Adjusting a toilet fill valve can solve many common toilet issues. The fill valve controls the water level in the tank. A properly adjusted valve ensures the toilet flushes correctly. This guide will help you adjust the fill valve and test the adjustment.
Refilling The Tank
After adjusting the toilet fill valve, the next step is refilling the tank. This process ensures the adjustment works correctly. Follow these steps to refill the tank:
- Turn on the water supply to the toilet.
- Wait for the tank to fill.
- Observe the water level inside the tank.
The water should stop about one inch below the top of the overflow tube. If the water level is too high or too low, you need to adjust the fill valve again. Here are some common adjustments:
| Issue | Solution |
|---|---|
| The water level too low | Lower the float on the fill valve. |
| The water level is too low | Raise the float on the fill valve. |
Refilling the tank ensures your adjustments were successful. For a few minutes, keep an eye on the water level. If it remains steady, the adjustment is correct.
Checking For Overflow
After refilling the tank, it’s essential to check for overflow. Overflow can cause water to spill out of the tank and wastewater. Follow these steps to check for overflow:
- Flush the toilet and watch the water level in the tank.
- Ensure the water stops below the overflow tube.
- Listen for any continuous running water sounds.
The fill valve needs further adjustment if the water level rises above the overflow tube. Adjust the float on the fill valve to lower the water level. Repeat the refilling and checking process until the water level is correct.
Checking for overflow is crucial to preventing water waste. A properly adjusted fill valve stops the water at the right level, ensuring efficient flushing and preventing overflow.
Reattaching The Tank Lid
Adjusting a toilet fill valve is a simple plumbing task. This guide explains how to reattach the tank lid. Toilet maintenance becomes easier with some basic knowledge. Understanding the fill valve settings and the water level adjustment can save time and money. DIY plumbing solutions empower homeowners to handle minor issues. Let’s go through the steps of reattaching the tank lid correctly.
Ensuring Proper Fit
Ensuring a proper fit for the tank lid is crucial. An improperly placed lid can cause problems. Here are some steps to ensure a proper fit:
- Check the edges of the tank for debris or damage.
- Align the lid with the tank carefully.
- Press down gently to secure it in place.
If the lid doesn’t fit properly, it may be due to an issue with the flush mechanism or the overflow tube. Inspect these components for any misalignment. Adjust the fill valve settings if necessary to ensure everything fits well. Knowing plumbing basics helps in identifying and fixing these issues. Toilet repair tips often include checking the lid alignment as a starting point.
In some cases, the tank lid may need replacement if it is broken. Ensure you get the correct size and shape. Measuring the tank dimensions is a good practice. This helps in finding a lid that fits perfectly.
Final Checks
After placing the lid, perform final checks to ensure everything works well. Flush the toilet to see if the lid stays in place. Listen for any unusual sounds. Check the water level adjustment in the tank. It should be below the overflow tube. This prevents water from spilling out.
Here are some final checks to consider:
- Inspect the water supply line for leaks.
- Ensure the fill valve settings are correct.
- Test the flush mechanism several times.
If any issues are noticed, adjust the toilet tank settings accordingly. Regular toilet maintenance helps in avoiding future problems. Following these simple steps ensures your toilet functions well. DIY plumbing solutions like these are handy for every homeowner. Remember, basic plumbing knowledge goes a long way in maintaining your home’s fixtures.
Common Issues
Toilet issues can be frustrating, especially when the fill valve isn’t working properly. Adjusting a toilet fill valve can solve many common problems. Understanding the issues and how to fix them can save time and money. This guide will help you address two common problems: continuous running and a water level that is too low.
Continuous Running
A toilet that keeps running can waste a lot of water. The problem often lies with the fill valve. Follow these steps to adjust it:
- First, remove the tank lid and locate the fill valve.
- Check the float. If it’s set too high, the water will never shut off.
- Adjust the float by turning the adjustment screw or moving the float clip.
- Flush the toilet and observe the water level. It should stop about an inch below the overflow tube.
If the issue persists, inspect the fill valve for any debris. Clean it if necessary. Sometimes, replacing the fill valve might be the best solution. A new fill valve can be found at most hardware stores.
Water Level Too Low
A low water level in the toilet bowl can cause weak flushes. Adjusting the fill valve can often solve this issue:
- Remove the tank lid and locate the fill valve.
- Check the float and adjust it to a higher position.
- Turn the adjustment screw or move the float clip upward.
- Flush the toilet and check the water level. It should be about an inch below the overflow tube.
If the water level is still low, inspect the fill valve for any blockages. Cleaning the valve can help. Another option is to replace the fill valve with a new one.
Proper adjustment of the fill valve ensures your toilet functions correctly. It helps maintain water efficiency and prevents common issues.

Frequently Asked Questions
What Is A Toilet Fill Valve?
A toilet fill valve controls the water level in the toilet tank. It refills the tank after a flush. Proper adjustment ensures efficient flushing.
Why Adjust A Toilet Fill Valve?
Adjusting the fill valve prevents water waste and ensures optimal flushing. It can also stop the toilet from running continuously.
How Do I Know If My Fill Valve Needs Adjustment?
If your toilet runs continuously or the tank overflows, your fill valve likely needs adjustment. Check for these signs.
What Tools Do I Need To Adjust A Fill Valve?
You typically need a screwdriver and pliers. Some fill valves can be adjusted by hand without tools.
Conclusion
Adjusting a toilet fill valve is simple and quick. Follow the steps carefully. This ensures your toilet works efficiently. A well-adjusted fill valve saves water and prevents leaks. Regular checks can prevent future issues. Now you know how to adjust it yourself.
Enjoy a smooth, efficient toilet system. Happy plumbing!
