
Installing a bathroom sink drain can seem daunting. But with the right steps, it’s manageable.
Whether you’re a DIY enthusiast or just trying to save some money, installing a bathroom sink drain yourself is a rewarding task. This guide will help you understand the process in clear, simple terms. We’ll break it down into manageable steps, so you can confidently tackle this project.
By the end, you’ll have a functioning sink drain and a sense of accomplishment. No need for professional help or expensive tools. Ready to get started? Let’s dive into the details and make this project as easy as possible.
Tools Needed
Installing a bathroom sink drain is a task that can be done by anyone with a bit of patience and the right tools. Whether you are replacing an old drain or installing a new one, having the necessary tools will make the job much easier. In this section, we will discuss the tools you need to install a bathroom sink drain.
Basic Tools
To successfully install a bathroom sink drain, you will need a few basic tools. These tools are essential for loosening and tightening parts, cutting pipes, and ensuring a watertight seal.
Here are the basic tools you will need:
- Adjustable Wrench: For tightening and loosening nuts and bolts.
- Pipe Wrench: Useful for gripping and turning pipes.
- Plumber’s Putty: Creates a watertight seal around the drain.
- Plumber’s Tape (Teflon Tape): Seals threaded pipe connections.
- Bucket: Catches any water that might spill during the installation.
- Hacksaw: Cuts metal pipes if needed.
- Screwdriver: Tightens screws on the drain assembly.
These tools are typically found in most households or easily purchased at any hardware store. Ensuring you have these on hand before starting will save you time and frustration.
| Tool | Use |
|---|---|
| Adjustable Wrench | Tightening and loosening nuts and bolts |
| Pipe Wrench | Gripping and turning pipes |
| Plumber’s Putty | Creating a watertight seal |
| Plumber’s Tape | Sealing threaded connections |
| Bucket | Catching water |
| Hacksaw | Cutting metal pipes |
| Screwdriver | Tightening screws |
Optional Tools
While the basic tools are sufficient for most installations, having some optional tools can make the process smoother and more efficient. These tools are not strictly necessary but can be very helpful.
Here are some optional tools that you might find useful:
- Basin Wrench: This specialized wrench makes it easier to reach and tighten nuts under the sink.
- Channel Lock Pliers: These pliers can grip large pipes and fittings more securely.
- Pipe Cutter: A cleaner and more precise alternative to a hacksaw for cutting pipes.
- Drain Removal Tool: Helps remove old drains without damaging the sink.
- Silicone Caulk: Provides an extra layer of waterproofing around the drain.
- Work Gloves: Protects your hands from sharp edges and debris.
- Flashlight: Ensures you can see clearly in tight or dark spaces under the sink.
These optional tools can help you tackle unexpected challenges during the installation. While you might not need all of them, having a few on hand can make the job much easier.
| Tool | Use |
|---|---|
| Basin Wrench | Reaching and tightening nuts under the sink |
| Channel Lock Pliers | Gripping large pipes and fittings |
| Pipe Cutter | Cutting pipes precisely |
| Drain Removal Tool | Removing old drains |
| Silicone Caulk | Extra waterproofing |
| Work Gloves | Protecting hands |
| Flashlight | Seeing in tight or dark spaces |
Preparation Steps
Installing a bathroom sink drain can seem daunting, but with the right preparation steps, the task becomes much simpler. Proper preparation ensures a smooth installation process and prevents potential issues. Here’s a detailed guide on the essential preparation steps before you install a bathroom sink drain.
Turn Off Water Supply
Before starting the bathroom sink installation, it is crucial to turn off the water supply. This step prevents water from spilling out and causing a mess.
Locate the water supply shut-off valves, usually found under the sink. If you cannot find individual shut-off valves, you might need to turn off the main water supply for the house.
Follow these steps to turn off the water supply:
- Locate the cold and hot water supply valves under the sink.
- Turn both valves clockwise until they are fully closed.
- If you need to turn off the main water supply, locate the main shut-off valve, typically found where the water line enters the house.
- Turn the main valve clockwise until it is fully closed.
Once the water supply is turned off, open the faucet to ensure no water remains in the lines. This step ensures you won’t encounter any leaks during the drain assembly and p-trap installation.
Check the area for any drips or leaks. If you see any, tighten the valves or consult a professional. Ensuring the water supply is entirely off is vital for sink maintenance and a successful installation.
Clear The Area
Clearing the area beneath and around the sink is an essential preparation step. It provides adequate workspace and prevents damage to surrounding items.
Here are some steps to clear the area effectively:
- Remove all items stored under the sink, such as cleaning supplies, toiletries, or any personal items.
- Place these items in a safe area away from the workspace.
- Clean any dust or debris from the area. This ensures a clean working environment.
Next, ensure you have all the necessary plumbing tools and materials within reach. This includes:
| Tool | Purpose |
|---|---|
| Wrench | Tightening and loosening nuts |
| Plumbing Sealant | Sealing joints |
| Pliers | Holding and turning |
| Bucket | Collecting water |
Make sure the sink drain components are ready for installation. This includes the drain flange, tailpiece, and p-trap.
By having a clear area and all necessary tools, you ensure a smooth DIY plumbing process. This step is critical for a successful bathroom sink installation.
Removing Old Drain
Installing a new bathroom sink drain can seem like a daunting task, but it doesn’t have to be. The first step is to remove the old drain. This process involves a few key steps, including disconnecting the P-trap and unscrewing the drain assembly. By following these steps carefully, you can ensure a smooth installation process.
Disconnect P-trap
Before starting, gather your tools. You’ll need a pair of pliers, a bucket, and a wrench. Begin by turning off the water supply to your sink. This will prevent any accidents or water damage.
Next, place the bucket under the P-trap. The P-trap is the curved pipe beneath your sink. It’s designed to trap debris and prevent clogs in your plumbing. Using your pliers, carefully loosen the slip nuts on either end of the P-trap.
Once the slip nuts are loose, you can remove the P-trap. Be prepared for some water to spill out, hence the bucket. Check the P-trap for any clogs or buildup. If you find any, clean them out before proceeding.
Here’s a simple breakdown of the steps:
- Gather tools: pliers, bucket, wrench
- Turn off the water supply
- Place bucket under P-trap
- Loosen slip nuts with pliers
- Remove P-trap and clean if necessary
Unscrew Drain Assembly
Now that the P-trap is removed, you can focus on the drain assembly. The drain assembly is the part of the sink that connects to the drain pipe. This part can be tricky, so take your time.
First, locate the drain flange. This is the visible part of the drain inside your sink. Using a wrench, unscrew the flange. You may need to use a plumber’s putty knife to help loosen it.
Next, go under the sink. Locate the locknut that holds the drain assembly in place. Using your wrench, unscrew the locknut. Be careful not to damage any surrounding pipes or the sink itself.
Once the locknut is removed, you can pull the drain assembly out from above. If the assembly is stuck, gently wiggle it to loosen it. Check for any remnants of plumber’s putty or sealant and clean them off.
Here’s a step-by-step guide:
- Locate and unscrew the drain flange with a wrench
- Use a plumber’s putty knife if necessary
- Go under the sink and locate the locknut
- Unscrew the locknut with a wrench
- Remove the drain assembly from above
- Clean off any remnants of putty or sealant
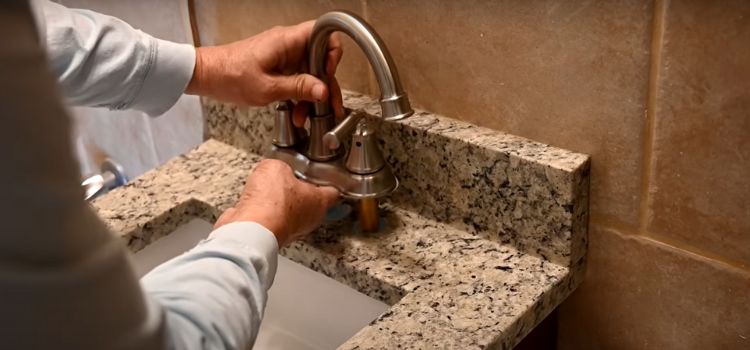
Installing New Drain
Installing a new drain in your bathroom sink can seem daunting. But, with a few simple steps, you can get the job done easily. This guide will help you install a bathroom sink drain, focusing on two key steps: positioning the drain flange and sealing it with plumber’s putty.
Position Drain Flange
Start by positioning the drain flange correctly. The drain flange is the visible part of the drain inside the sink bowl. It connects the sink to the drain pipe below.
Follow these steps to position the drain flange:
- Remove any old drain parts from the sink. Clean the sink hole thoroughly.
- Place the new drain flange in the sink hole. Make sure it fits snugly.
- Check the alignment of the flange. Ensure it sits flat and even.
- From underneath the sink, attach the rubber gasket and washer to the flange.
- Screw the nut onto the threaded part of the flange to secure it.
It’s important to ensure the flange is tight and secure. This prevents leaks and ensures proper drainage. Use a wrench if necessary to tighten the nut. Be careful not to overtighten, as this can damage the sink or the flange.
Seal With Plumber’s Putty
Next, seal the drain flange with plumber’s putty. Plumber’s putty creates a watertight seal between the sink and the drain flange. This step is crucial to prevent leaks.
Here’s how to apply plumber’s putty:
- Take a small amount of plumber’s putty and roll it into a rope-like shape.
- Place the putty around the underside of the drain flange.
- Press the flange into the sink hole. The putty should squeeze out around the edges.
- From underneath the sink, tighten the nut again to secure the flange.
- Wipe away any excess putty that squeezes out from the edges.
Plumber’s putty ensures a tight seal. It remains pliable, allowing for easy adjustments if needed. After sealing, run water through the drain to check for leaks. If there are no leaks, your new bathroom sink drain is successfully installed!
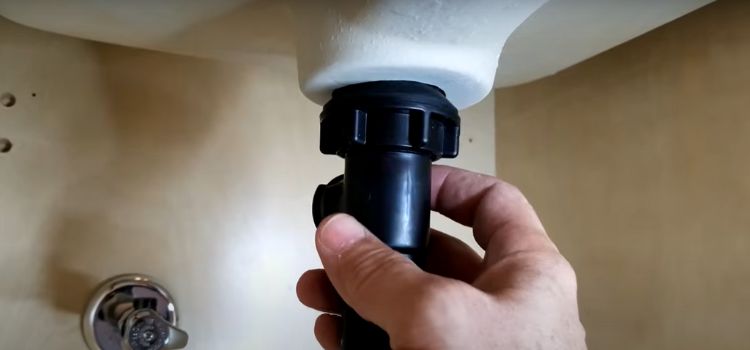
Connecting The P-trap
Installing a bathroom sink drain involves several steps, but one of the most crucial is connecting the P-Trap. The P-Trap is an essential component that prevents sewer gases from entering your home. Proper installation ensures the sink functions correctly and keeps your bathroom smelling fresh. Here’s how to connect the P-Trap effectively.
Align The P-trap
The first step in connecting the P-Trap is to align it correctly. The P-Trap consists of two main parts: the curved trap and the straight tailpiece. Follow these steps to ensure proper alignment:
- Position the curved part of the P-Trap under the sink drain tailpiece.
- Ensure the other end connects to the horizontal drain pipe coming from the wall.
- Adjust the height of the tailpiece by cutting it if necessary. Use a hacksaw for a clean cut.
- Make sure the curved part of the P-Trap is directly below the sink drain.
- Slide the slip nuts and washers onto the tailpiece and horizontal drain pipe.
Proper alignment is crucial to prevent leaks. Double-check that all parts fit snugly and are in the correct position. The curved part of the P-Trap should create a water seal to block sewer gases.
Tighten Connections
Once the P-Trap is aligned, it’s time to tighten the connections. This ensures a secure and leak-proof setup. Follow these steps:
- Hand-tighten the slip nuts on both ends of the P-Trap.
- Use adjustable pliers to give an extra quarter turn. Be careful not to overtighten, as this can crack the pipes.
- Check for leaks by running water through the sink. Look under the sink for any drips.
- If you notice leaks, tighten the slip nuts a bit more until the leaking stops.
- Inspect the washers and slip nuts to ensure they are properly seated.
Avoid over-tightening, as this can cause damage. Instead, focus on securing the connections enough to prevent leaks. After tightening, run water through the sink to test the setup.
With these steps, you will have successfully connected the P-Trap. Proper alignment and tightening ensure a functional and leak-proof bathroom sink drain.
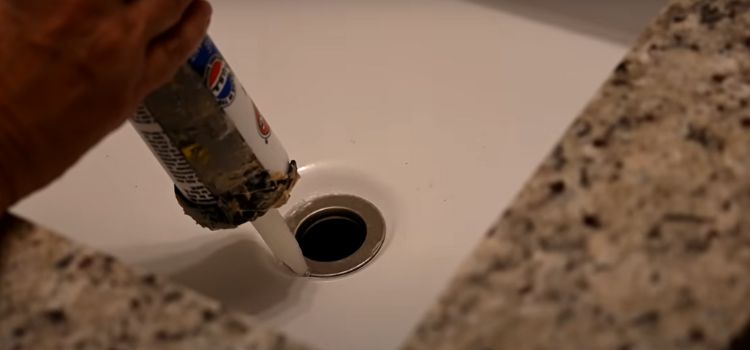
Testing For Leaks
After installing a bathroom sink drain, the next crucial step is to test for leaks. Testing for leaks ensures that the drain and its connections are secure and will not cause water damage. This step involves running water through the drain and inspecting all connections for any signs of leakage.
Run Water
To start, turn on the faucet and let the water run for a few minutes. This will help you identify any leaks that might not be visible immediately. Follow these simple steps to effectively run water through your new drain:
- Open the faucet to a moderate flow.
- Let the water run for at least 3-5 minutes.
- Observe the water flow and ensure it drains properly without pooling.
Running water through the drain helps in two primary ways:
- It checks the immediate functionality of the drain.
- It reveals any slow leaks that might not appear right away.
Note: Pay attention to the water flow. If you notice slow drainage or any unusual sounds, there might be an issue with the installation. Running water is a simple yet effective way to ensure your bathroom sink drain is working correctly.
Inspect Connections
After running water through the drain, it’s time to inspect all connections for any signs of leaks. Here’s how to do it:
- Check the P-trap and all other joints for moisture.
- Use a flashlight to get a clear view of hidden areas.
- Feel around the connections with your hand to detect any dampness.
If you find any moisture, tighten the connections carefully. Sometimes, even a slight adjustment can stop a leak. Here’s a simple table to help you troubleshoot common issues:
| Issue | Possible Cause | Solution |
|---|---|---|
| Moisture at connections | Loose fittings | Tighten the connections |
| Water pooling under sink | Faulty seal | Replace the washer or seal |
| Slow drainage | Clog in the pipe | Clear the clog |
Final Tip: Ensure all connections are dry and secure before considering the installation complete. Inspecting connections thoroughly can save you from potential water damage and costly repairs in the future.
Final Adjustments
Installing a bathroom sink drain can be a fulfilling DIY project. Once the main installation is done, it’s essential to make final adjustments to ensure everything works perfectly. These adjustments help prevent leaks and ensure stability, giving you peace of mind. Let’s dive into the final steps: adjusting tightness and checking for stability.
Adjust Tightness
Properly tightening all the fittings is crucial for leak prevention. Start by checking the connections of the drainpipe and the sink drain parts. Use the right plumbing tools to ensure a snug fit without over-tightening. Over-tightening can damage the components and cause leaks.
Follow these steps to tighten the fittings:
- Check the drain assembly and ensure all washers are in place.
- Use a wrench to gently tighten the nuts on the drainpipe connection.
- Adjust the tightness of the sink trap installation to prevent water from escaping.
- Inspect the drain assembly for any loose parts and tighten as needed.
It’s important to test for leaks after tightening each fitting. Run water through the sink to ensure no water escapes from any connection. If you notice any leaks, slightly adjust the tightness until the leak stops.
Here is a table to summarize the tools you may need:
| Plumbing Tools | Purpose |
|---|---|
| Wrench | Tighten nuts and fittings |
| Plumber’s tape | Seal threads |
| Basin wrench | Reach tight spaces |
Check For Stability
Ensuring the stability of the sink drain is a key part of plumbing maintenance. A stable drain prevents future leaks and supports the overall structure of the sink. Start by checking the alignment of the drainpipe. It should be straight and properly connected to the sink drain parts.
Here are some DIY plumbing tips to check for stability:
- Gently push and pull the drainpipe to test its stability.
- Ensure the sink trap installation is secure and not wobbly.
- Check that all drain assembly components are properly aligned.
If you find any loose parts, use the appropriate plumbing tools to tighten them. Pay special attention to the drainpipe connection. It should be solid and free from any movement. You can also apply plumber’s tape to thread connections for added stability.
Run water through the sink again to ensure there are no leaks and that the drain remains stable. If everything is secure, your bathroom sink installation is complete. Regular checks and adjustments will keep your plumbing in top shape and extend the life of your sink.
Maintenance Tips
Installing a bathroom sink drain is only the first step. Keeping it in good shape requires some regular maintenance. Here are some tips to help you maintain your sink drain efficiently. These tips will help prevent clogs and extend the life of your plumbing.
Regular Inspections
Regular inspections are key to maintaining your bathroom sink drain. Check your sink drain every few months. Look for signs of wear and tear. This can include rust, corrosion, or leaks.
Inspecting your sink drain ensures you catch small problems before they become big issues. Here are some steps to follow during your inspections:
- Check for leaks: Look under the sink for any water droplets or dampness.
- Examine the pipes: Make sure the pipes are not rusted or corroded.
- Test the drain: Run water and see if it drains quickly and smoothly.
If you find any issues, address them immediately. A small leak can lead to water damage and mold. Corroded pipes can weaken and cause bigger problems later. Regular inspections help you avoid costly repairs.
Cleaning Techniques
Cleaning your bathroom sink drain is essential to prevent clogs. A clean drain keeps your sink functioning smoothly. Here are some effective cleaning techniques:
Weekly Cleaning:
- Pour hot water down the drain. This helps dissolve soap scum and other debris.
- Use a mild detergent to clean the sink. Avoid harsh chemicals that can damage the pipes.
Monthly Cleaning:
- Mix baking soda and vinegar. Pour the mixture down the drain. Let it sit for 15 minutes, then flush with hot water.
- Use a drain snake to remove any hair or debris. This helps keep the drain clear.
Deep Cleaning: Every six months, disassemble the drain pipes and clean them thoroughly. Use a brush to scrub the pipes and remove any buildup.
Regular cleaning prevents clogs and keeps your drain in top shape. It also helps eliminate odors and ensures your sink works efficiently. Follow these techniques to maintain a clean and functional bathroom sink drain.
Frequently Asked Questions
How Do I Remove An Old Sink Drain?
To remove an old sink drain, first, unscrew the locknut. Then, disconnect the P-trap. Finally, lift the drain out.
What Tools Are Needed For Sink Drain Installation?
You’ll need a wrench, plumber’s putty, a screwdriver, and a bucket. These tools make the installation process easier and efficient.
How Do I Seal A Bathroom Sink Drain?
Apply plumber’s putty around the drain’s rim. Press the drain firmly into the sink. Tighten the locknut underneath.
Why Is My Sink Drain Leaking?
A sink drain may leak due to loose connections. Check the seals and tighten any loose parts to fix leaks.
Conclusion
Installing a bathroom sink drain doesn’t need to be difficult. Follow the steps carefully. Gather all necessary tools beforehand. Remember to turn off the water supply. Tighten connections properly to avoid leaks. Check for any drips after installation. Ensuring a proper seal is crucial.
A well-installed drain ensures smooth water flow. This DIY task can save you money. Enjoy your newly functioning bathroom sink!